Editing schemas, ontologies, and SKOS taxonomies with VocBench
A free GUI tool.
![[VocBench logo]](https://www.bobdc.com/img/main/VocBenchLogo.png)
According to the Wikipedia page for SKOS, VocBench “is an open-source, web-based RDF/OWL/SKOS/SKOS-XL editor developed by a collaboration between the Food and Agriculture Organization (FAO) of the United Nations, the University of Rome Tor Vergata and the Malaysian research centre MIMOS”. I’m usually happy to create schemas, ontologies, and SKOS taxonomies by hand with Turtle files in a text editor, but I thought that a free, cross-platform graphical tool for creating and editing these was worth investigating—especially if it lets you create and edit instance data to go with your schemas and ontologies. VocBench did a fine job with all of these.
Like my former employer TopQuadrant’s former product TopBraid Composer, VocBench’s overall layout appears to be descended from the open source ontology editor Protégé. (The last time I tried Protégé and its more modern successor WebProtégé, I still found them confusing, with more documentation about advanced features than about the simple basics. I gave up.)
My test goals with VocBench were simple:
- Load a sample existing RDF schema and use VocBench’s web-based interface to:
- Create a new class based on an existing one
- Create a property that has the new class as a domain
- Edit some instances of the new class and check whether the new properties are part of the edit form
- Query some data with SPARQL
- Load some existing SKOS and see how that looks
It was important for me to start off with existing files that were already on my hard disk. This way, I could verify that the tool’s standards support was really there and that using the tool didn’t depend on special things that it added to the model files.
Installing and running
First I downloaded the most recent zip file from https://bitbucket.org/art-uniroma2/vocbench3/downloads/. Unzipping this created a directory named semanticturkey-12.2/. (VocBench’s home page tells that its “business and data access layers are realized by Semantic Turkey, an open-source platform for Knowledge Acquisition and Management realized by the ART Research Group at the University of Rome Tor Vergata”.)
Next, I ran the semanticturkey.sh script in the semanticturkey-12.2/bin directory, which also has a semanticturkey.bat file for Windows users. As the VocBench documentation describes, the next step is to send your browser to http://localhost:1979/vocbench3. You have to register and make up a password, and then at http://localhost:1979/vocbench3/#/Sysconfig you set up the server. I just accepted all the default settings on the setup screen.
Their documentation suggests that the next step is a “quick Test Drive”. The Test Drive page is too long and detailed to do quickly, so I just figured out the following myself.
I started by selecting Projects on the main menu and then Create on the Projects screen. The next screen, which is shown as the second screen shot on the Test Drive page, has many properties that you can fill out, but I went with the bare minimum:
- Project name: emptest
- Base URI:
http://example.org/emptest/ - Model: RDFS
- Lexicalization: RDFS (the default value; you’ll see that I picked a different value for this for my SKOS test below)
I clicked Create in the lower right, and then a popup told me “Project created successfully”.
Back on the Projects screen I clicked the radio button in the “Accessed” column of the emptest row. This seemed to be the quickest way to make it the current project.
In the upper left VocBench then showed “Current project: emptest” and a “Global Data Management” dropdown menu to the right of that. The dropdown has the handy choices to Load data, Export data, Clear data, and a few others. I picked Load data and imported the following person.ttl file:
@prefix ex:     <http://example.com/> .
@prefix schema: <http://schema.org/> .
@prefix rdfs:   <http://www.w3.org/2000/01/rdf-schema#> .
@prefix rdf:    <http://www.w3.org/1999/02/22-rdf-syntax-ns#> .

ex:Person a rdfs:Class .

schema:familyName a rdf:Property ;
                  rdfs:domain ex:Person .

schema:givenName a rdf:Property ;
                 rdfs:domain ex:Person .
After doing this, selecting Data from the main menu showed this in a widget for editing the class hierarchy:
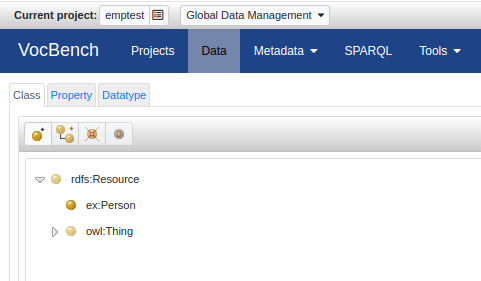
I selected ex:Person there and then clicked “Create subClass” (the second of the four buttons above it—throughout these instructions, whenever I refer to an icon by name and you don’t see the name, mouse over the buttons until you find the tooltip with that name) to create an Employee subclass, and that was added to the visual hierarchy.
To add a startDate property to go with that, I selected the Property tab above the class hierarchy and selected its Create property button. I picked datatypeProperty from this button’s dropdown menu and entered “startDate” as the property name, and then I saw this new property added to the list on the Property tab on the left.
With the new property selected there, on the right side of the screen I clicked the Add domain button to the right of the Domains header. I then selected Employee from the class hierarchy widget that it displayed, and clicked OK on the Add domain dialog box. Below the Domain header was a Range header with a similar button that let me add xsd:date as a range for startDate.
To really see what this was creating, I went back to the “Global Data Management” dropdown and picked Export Data. On the lower-right of the next screen I changed the Export Format from RDF/XML to Turtle (it is 2024, after all) and clicked Submit. Here is the export.ttl file that this created, without its prefix declarations:
<http://example.org/emptest/> a owl:Ontology .

ex:Person a rdfs:Class .

schema:familyName a rdf:Property;
  rdfs:domain ex:Person .

schema:givenName a rdf:Property;
  rdfs:domain ex:Person .

:Employee a rdfs:Class;
  rdfs:subClassOf ex:Person .

:startDate a owl:DatatypeProperty;
  rdfs:range xsd:date;
  rdfs:domain :Employee .
That was just what I was hoping for.
Going back to the Class tab we see an instances panel underneath it, where the first button lets you add an instance for the selected class:
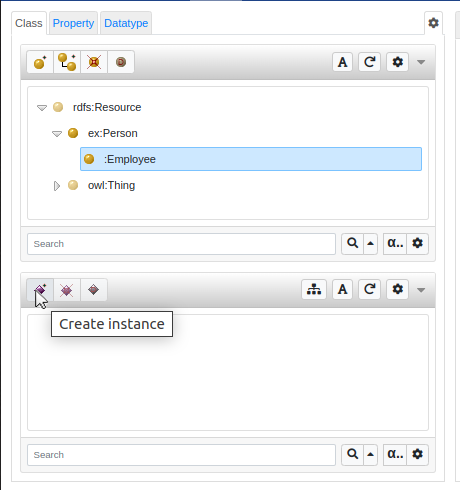
Clicking it displays a popup where you create a URI for the new instance; clicking Ok on that message box adds it to the instance list. Once it’s there, you can select it, and then the form on the right lets you edit it. Selecting the blue Add property button to the right of Other properties on that form displayed a popup that gave me the opportunity to add or edit the startDate, familyName, or givenName properties for the new instance. I was happy to see that the editing of an instance’s data automates the use of both assigned and inherited properties on the editing widget for that data.
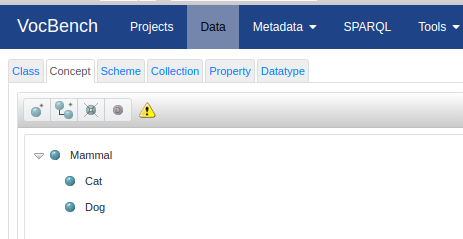
Selecting SPARQL from the main menu gave me a SPARQL screen where it was easy enough to write and execute SPARQL queries, so all that was left was to load some existing SKOS and see what VocBench did with it. I took example ex327.ttl from my book “Learning SPARQL” and created a new VocBench project for it. For this project, I set both Model and Lexicalization to SKOS. (Don’t forget to set a Base URI, as I did several times when trying to create a new project.) After I created this new project and made it the current one I imported the ex327.ttl file. I then picked Data from the main menu and after expanding the widget in the Concept tab a little I saw this:
Of course VocBench can do much more than what I’ve shown here, but my first priority was to see how it covered the basics, and it did just great with these. The rest of its Test Drive page shows plenty of potential follow-up exercises.
Comments? Reply to my tweet (or even better, my Mastodon message) announcing this blog entry.


Share this post